Ultrasound reading entails giving meaning to the details in the ultrasound photo. These details include text and numbers, images, and colors in different shades.
Focusing on these three types of details, I put together this 3-step guide to reading an ultrasound.
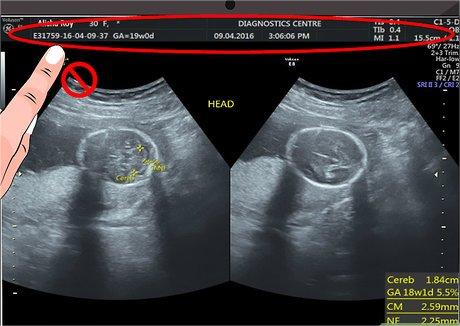
The tiny scripts on an ultrasound image can be intimidating, just like other medical inscriptions. For that reason, most people will tell you to ignore the writings, and they are right to some extent.
You don’t need to fret trying to understand every word on an ultrasound image. The only information that may interest you is the name that shows the ultrasound imaging was done on you.
Other details you can easily decode include the date and a medical reference number.
Leave the other less decipherable writings on the ultrasound to doctors and sonographers. Often, these are ultrasound machine interpretations of the settings and instructions the sonographer feeds to the ultrasound machine during imaging.
The orientation of the ultrasound is important in order to understand what you see on the screen or printed ultrasound picture.
When the radiologist or doctor performs the ultrasound, s/he first checks the probe to identify the indicator. As a standard rule, the indicator should face the patient’s right when the probe is transverse and point to the patient’s head in a longitudinal orientation.(1)
So, to read the image, imagine the patient lying supine (on their back, face up) on the examination bed. The radiologist places the probe on the patient’s abdomen in a transverse orientation.
So, here’s what you’ll see on the screen or the printed version of the ultrasound:
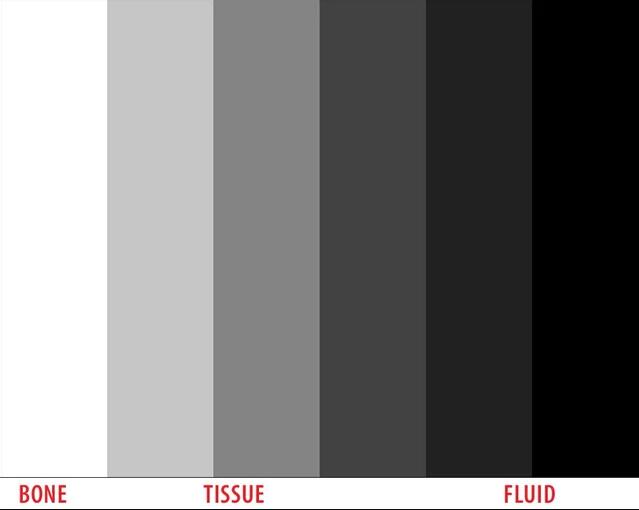
We know ultrasound pictures as black and white. Sometimes, however, you will notice gray shades and red and blue colors.
So, what do the colors on an ultrasound photo mean?
To understand the colors of an ultrasound, it is crucial to appreciate first how these colors come about.
When the sonographer places the probe on your skin and presses the scan button, the probe sends high-frequency sound waves (2-10kHz) through body tissues to the targeted body structure.
Once the sound waves hit the body tissues, they are reflected back, and the probe receiver detects them as sound echoes. This is why the ultrasound is sometimes called echography. The echo sounds then appear as images on the ultrasound monitor.
Not all body tissues react in the same way to ultrasound waves. Some tissues bounce back an echo from ultrasound waves more readily than others. Experts call this ability of body tissues to return an echo signal when hit by sound waves
echogenicity.(3)
So, it is a tissue’s echogenicity that determines what color it returns on the ultrasound image:
We can use this info on ultrasound colors to give an example of what breast cancer looks like on ultrasound.
If you have a fluid-filled cyst in your breast, it will show as black circles on ultrasound (remember that fluid is anechoic and, therefore, black).
Cancerous tissues are hypoechoic. So, if you have a cancerous tumor in your breast, it will present in a gray shade, but darker than the surrounding normal hypoechoic tissues. (4)Always remember that the oncologist is the best interpreter of a breast cancer ultrasound.
Back to ultrasound color interpretation.
With advanced imaging technology, today’s ultrasounds can also show other colors. This usually happens through the
color Doppler imaging technique.(5)
In ultrasound imaging, color Doppler produces color codes of tissue speed and flow direction over gray images to show blood movement in veins and arteries. As a diagnostic tool, the color codes can help detect blood clots, narrowed arteries, or other blood-flow-related medical issues.
On a normal ultrasound, however, the red and blue colors reflect the direction of blood flow to or away from the ultrasound probe. Some healthcare practitioners use the BART mnemonic code to remember that:
If you’ve understood these 3 steps of how to read ultrasound, we can now proceed to an actual example of how to read pregnancy ultrasounds.