• 📦 TRY DRSONO WITH A 12-MONTH GUARANTEE+FREE SHIPPING
  • ✈️ Order today, ships within 1 business day at the earliest!
  • Professional Pricing Access — Save $100–$150

Quick Start Guide

Home
Guide
Preparing to Download the App
First Connection Setup (Mobile/Tablet)
Windows App Usage
Connection Error
Adjusting Settings

First-Time Linking

Step 1 Power On the Probe

Press the central button. A blue light will appear, and the battery indicator will light up in blue.

Step 2 Enable Location Services

Turn on location services on your smartphone or tablet.

Step 3 Turn On WiFi

Turn on WiFi on your smartphone or tablet.

Step 4 Find the Correct WiFi ID

From your WiFi list, choose the network that matches the SN’s last characters.
  • Check the Device Serial Number (SN):
    Find the SN label on the back of the probe and note the last few characters/digits.
  • Look for the WiFi ID:
    In your WiFi list, you will see a network name in this format:
    Two random letters or numbers + dash + three random letters or numbers + space + 9 characters (letters or numbers).
  • Example: AB-123 456789XYZ
    The last part matches the last characters of the device’s SN.

Step 5 Enter Password

Input the connection password, which is the lowercase SN from the back of the probe. For example, if the SN is WXPCDMH070, the password will be "wxpcdmh070".

Step 6 Launch the App

Once the probe’s WiFi is successfully connected, open the app to start scanning.
how to use-Tri-scan Max -Portable ultrasound Scannerhow to use-Tri-scan Max -Portable ultrasound Scanner
If you're using a Windows device, you can download the installation file using this link
Wireless USG Ultrasound Scanner - Windows version
Dr.Sono Windows App-Wireless USG
Works on Windows 7, 10, and 11.
V.2.0.17
Download
  1. Install the Software Using an Administrator Account: If you are not logged in as an administrator, you won't be able to save images and videos to your computer. Switching to an administrator account requires Windows 7, 10, or 11 Professional or Enterprise editions.

    Press Windows key + R and enter compmgmt.msc to open Computer Management.

    Click on “System Tools” on the left side, then “Local Users and Groups.”

    Find “Administrator” on the right side, double-click to open.

    In the “Administrator Properties” window, check the box for “Password never expires.”

    Uncheck “Account is disabled,” then click Apply and OK.

    Click the Start menu, select your username, and the “Administrator” account will appear for you to switch to.

  2. Install the Software: First, unzip the installation package. Click to install, simply follow the prompts by clicking NEXT > NEXT > NEXT > Install.

    The file is named WirelessUSG158.exe.

  3. Connect to the Probe's WiFi Signal: Once installation is complete, connect your computer to the probe's WiFi signal. The WiFi password for the probe is the lowercase password starting with “W” found on the casing.

  4. Saving Video and Images: To save videos and images, you need to click on “Save Patient Data” so that images and videos can be stored locally on your computer.

  5. Accessing Saved Files: To view images and videos, navigate to the following path:

    Computer > Local Disk (C:) > Program Files > WirelessUSG > WirelessUSG.

PC Installation Instructions 1

Troubleshooting Connection Issues

Please first check if your mobile device or tablet has location services enabled. If location services are on and you've entered the correct password but still cannot connect, follow these steps to troubleshoot:

Check Indicator Lights:

  • Ensure the indicator light on the probe is flashing normally.
  • If the light is not flashing correctly, please contact us at: [email protected].

Check WLAN List:

  • If the probe's indicator light is functioning but you cannot find the corresponding channel in the WLAN list, it may be due to the following reasons:

    WiFi Channel Blockage:

    • The WiFi channel used by the probe may be blocked in your area.

    Android Device Restrictions:

    • If you are using an Android phone, certain third-party WiFi channels may be restricted in your current version, which is more common with Android devices.

Solutions:

Method 1: Using iOS Devices

Since iOS systems are generally more unified and stable, we recommend trying to connect the ultrasound device to an iOS device (iPhone or iPad). Here are the steps:

Step 1: Connect to iOS Device:

  • Connect your iOS device to the ultrasound scanner.
  • Open the "Settings" app on your iOS device.

Step 2: Change WiFi Channel:

  • Change the WiFi channel to 5G40.

Step 3: Reconnect Android Device:

  • After making this change, try reconnecting your Android phone to the scanner.

Method 2: Using Windows System

If you have access to a Windows system, you can modify the WiFi channel using our application. Please follow these steps:

  1. Open the Application:
    • Launch our application on your Windows device.
  2. Change WiFi Channel:
    • Change the WiFi channel to 5G40 or any other available channel until you can establish a stable connection with your mobile device or tablet.

If you continue to experience issues, please feel free to contact us at [email protected] for further assistance.

For tablets, parameter adjustments can be made on the left side of the application interface. For smartphones, parameter adjustments can be made at the bottom of the app interface.

Gain (GN):

Gain control is displayed in the parameters as "Gain+" and "Gain-" icons. Clicking on the "Gain+" icon increases the gain, while clicking on the "Gain-" icon decreases it. The gain range is from 30dB to 105dB.

Note: Increasing the gain will result in a brighter image with more echo signals observable, yet it may also introduce additional imaging noise.

Gain (GN)-DRSONO portable ultrasound -APP

Depth (D):

Adjusting the scan depth penetration is controlled in the parameters as "Depth". Tapping increases or decreases it, and you can also modify the image depth by sliding the screen of your smartphone/tablet up or down.

Depth (D)-DRSONO Portable ultrasound scanner App

Focus:

The focus control is displayed as the "Focus" icon in the parameters. Tapping allows selection between 0 to 3. Contrast and resolution of the image at the focus point will increase, providing a clearer view.

Focus-DRSONO Portable Ultrasound Scanner App

Dynamic Range:

The dynamic range control is represented by the "Dyn" icon in the parameters. Tapping allows adjustment between 40 to 110 to modify the image's dynamic range.

Note: Increasing the dynamic range will display more layers and information in the image, simultaneously introducing more noise.

Dynamic range-DRSONO Portable Ultrasound Scanner APP

Harmonic:

The frequency control is represented by the "Harmonic" icon in the parameters. Tapping allows for changing the probe's operating frequency.

Note: Typically, the frequency is automatically selected based on specific presets.

Harmonic- DRSONO Portable ultrasound scanner

Denoise:

The denoising control is displayed as the "Denoise" icon in the parameters. Tapping allows selection from 0 to 4. 0 represents no denoising. We typically recommend setting it to 2 or 3.

Note: Denoising refers to reducing imaging noise. It will enhance clarity while reducing frame rate.

Denoise -DRSONO portable ultrasound scanner

Modes:

Mode control is displayed as the "B" icon in the parameters. Tap the "B" icon to expand different Doppler options, including B, B/M, Color Doppler, Pulsed Wave Doppler, and Power Doppler. Tap to select the desired mode.

Modes-DRSONO Portable Ultrasound Scanner

Time Gain Compensation (TGC):

The TGC control is positioned on the right side of the interface (for tablets) or at the top right corner (for smartphones). Tap the arrow icon to expand the bar graph and then slide to make adjustments.

Note: TGC normalizes signal amplitude over time; compensates for depth.

Time Gain Compensation -DRSONO portable ultrasound scanner

Biopsy :

Biopsy functionality refers to drawing a puncture line for needle guidance. Tap the "Biopsy" icon to expand options such as in-plane injection and out-of-plane injection.

Biopsy-DRSONO Portable Ultrasound Scanner ApP

Download & install the app

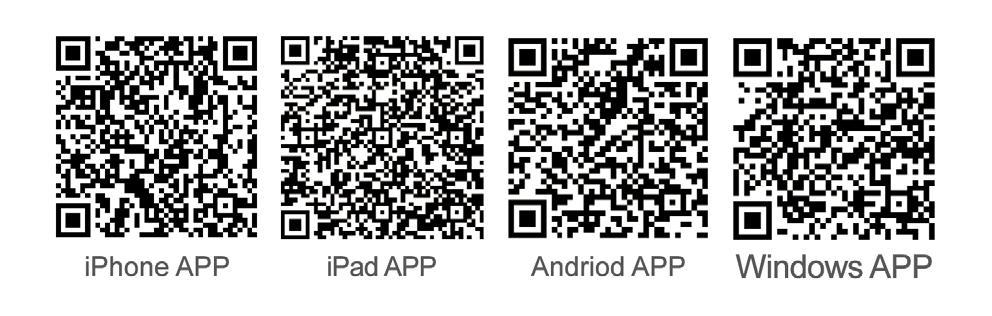
For iOS devices, visit the Apple App Store. If you're using an Android device, head to the Google Play Store. Look for the WirelessUSG app, then click the "Install" button. The app will begin installing on your smart device. Open the app to start the scanning process. You can also directly click the button below to install the app.
DRSONO ultrasound scanner App Store IconDRSONO handheld ultrasound scanner Google Play Icon
You can also using the two-dimensional code scanning software to scan the two-dimensional code below, you can get the download link of APP for installation.
Please enable the location services on your phone or tablet
DRSONO APP-two-dimensional code

PC Installation Instructions

If on Windows device, can download the install file by this link(after download UNcompress):
1. Install the software using the administrator account Administrator
If you are not the administrator account, you will not be able to save pictures and videos to your computer.
Switching administrator account requires WIN7 WIN10 WIN11 professional enterprise system.
  • Windows logo key + R and type compmgmt.msc to open Computer Management.
  • Click "System Tools" - "Local Users and Groups" on the left side of the computer management interface.
  • Then find Administrator on the right side and double click to open it.
  • In the "Administrator Properties" window that opens, check the box "Password users never expire".
  • Remove the checkmark in front of "Accounts are disabled", click Apply and OK;
  • Click on the start menu, click on the user name, it will pop up "Administrator" administrator account, click to switch.
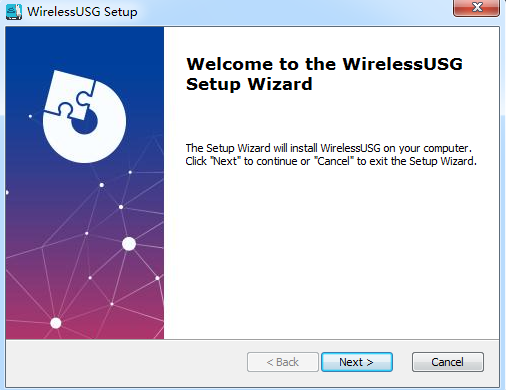
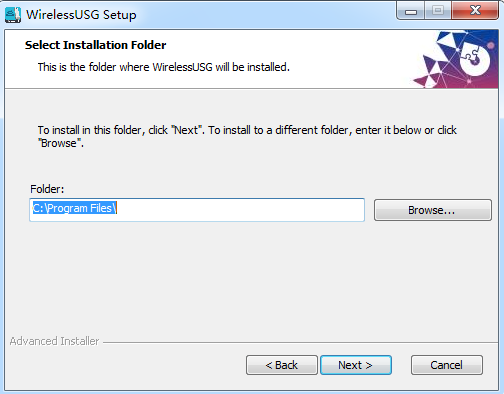
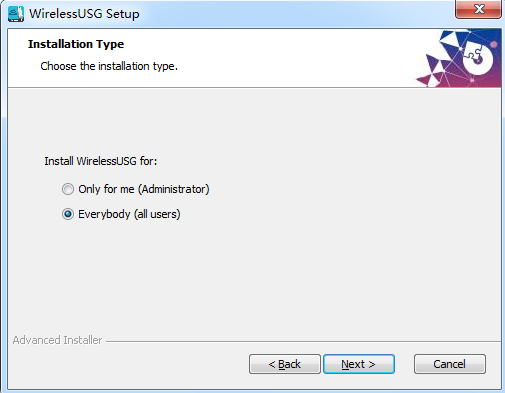
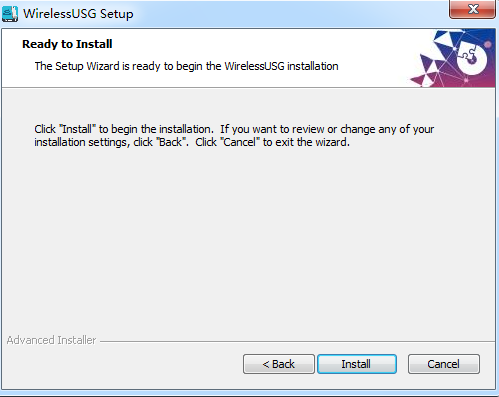
2. First unzip the installation package, click to install, the installation method directly click NEXT>NEXT>NEXT>Install
WirelessUSG158exe
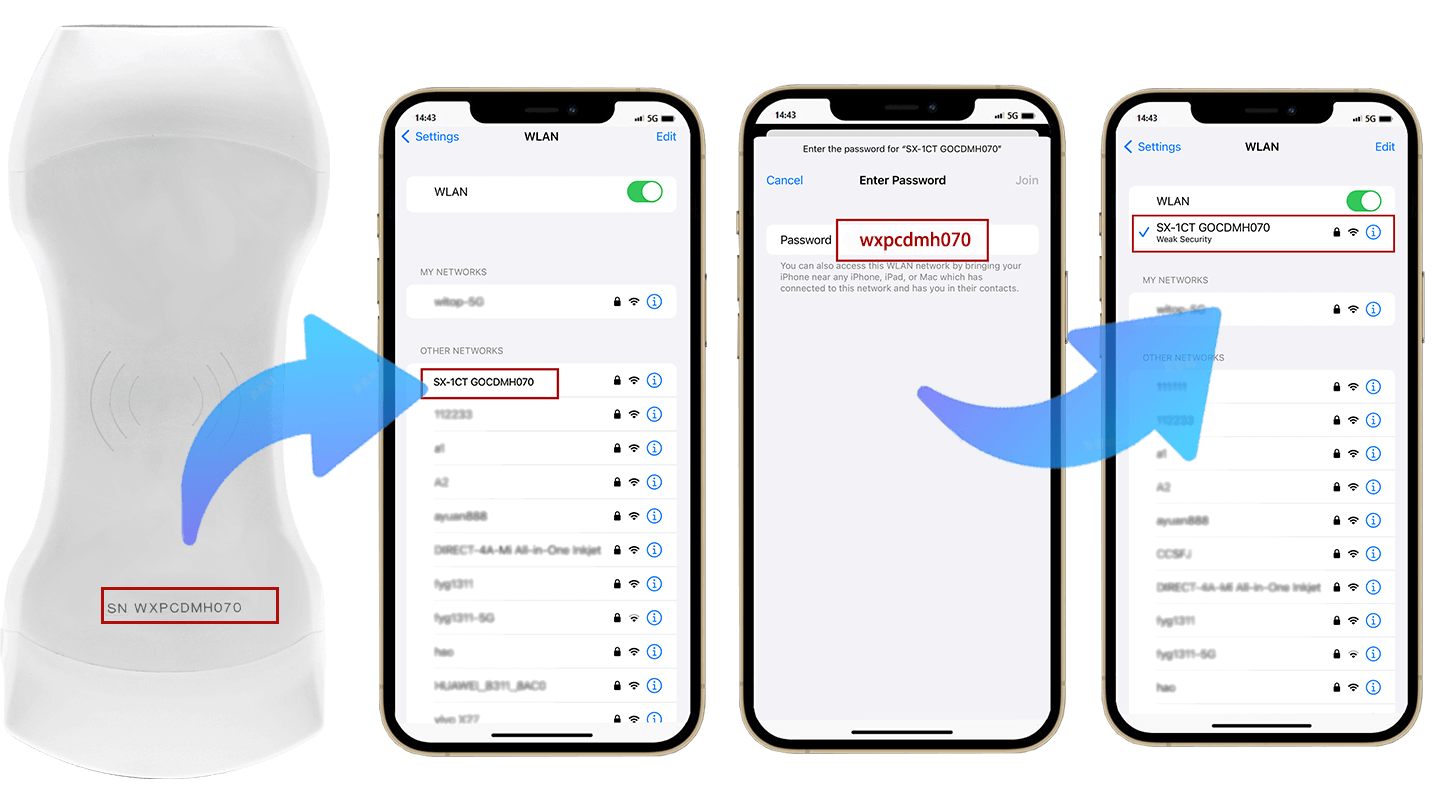
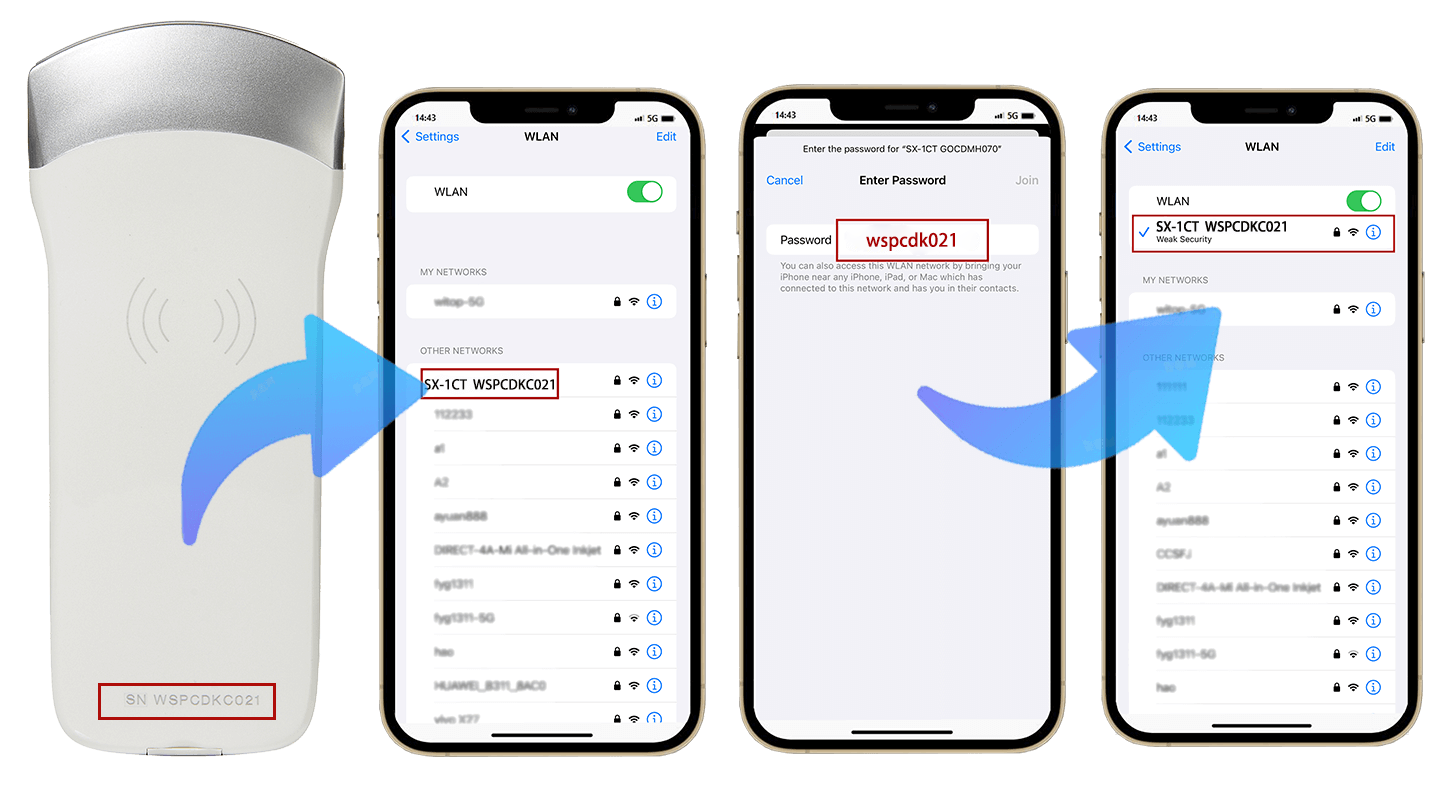
      After the installation is complete, connect the computer to the probe WIFI signal WIFI password for the probe shell            above the W beginning all lowercase password
3. To save videos and images, you need to click Save Patient Data so that the pictures and videos can be saved locally on your computer.
4. To view pictures and videos please find the following path :Computer - local disk (C:) - Program Files - WirelessUSG - WirelessUSG

First-Time Linking

Step 1:

In the WLAN list, select the WiFi ID whose last few characters/numbers are the same as the SN on the back of the probe.

Step 2:

Enter the connection password (on the back of the probe, the lower case SN is the password, for example, if the SN is WSPCDKC021, the password is wspcdkc021).

Please see the attached tutorial image.

how to use-Tri-scan Max -Portable ultrasound Scannerhow to use-Tri-scan Max -Portable ultrasound Scanner
If after completing the app download and entering the correct password, you still cannot connect the device to your phone or tablet (or cannot display images), please enable the location services on your phone or tablet. 

Once enabled, the device will be able to recognize the network, and you can use it normally.

Fail to Connect

If you have enabled location services on your phone and entered the correct password but still cannot successfully connect to your phone or tablet, please follow these steps:
  • **Check the Indicator Light**:
    - Ensure that the indicator light on the probe is flashing correctly.
    - If the indicator light is not flashing normally, please contact us at [email protected]

  • **Check WLAN List**:
    - If the probe’s indicator light is functioning correctly but you cannot find the corresponding channel in the WLAN list, it might be due to the following reasons:

         WiFi Channel Blocking:
       - The WiFi channel used by the probe might be blocked in your region.

         Android Device Restrictions:
        - If you are using an Android phone, it might be due to the current version restricting certain third-party WiFi channels, which is common in Android devices.

Solutions:

Method 1: Use an iOS Device                                                                                                                                                                             
Since iOS systems are generally more unified and stable, try connecting the ultrasound scanner to an iOS device (iPhone or iPad). Follow these steps:
  • Step 1: Connect the iOS Device:
    - Connect your iOS device to the ultrasound scanner.
    - Open the "Settings" app on your iOS device.

  • Step 2: Change WiFi Channel:
    - Change the WiFi channel to 5G40.

  • Step 3: Reconnect Android Device:
    - After making this change, try connecting your Android phone to the scanner again.
Method 2: Use a Windows System                                                                                                                                                                   
If you have access to a Windows system, you can use our application to modify the WiFi channel. Follow these steps:                    
  • 1. Open the Application:
    - Launch our application on your Windows device.

  • 2. Change WiFi Channel:
    - Change the WiFi channel to 5G40 or any other available channel until you can establish a stable connection with your phone.
If you continue to experience issues, please do not hesitate to contact us at [email protected] for further assistance.                   

Join Our Mailing List & Save!

Enter your email address below to receive exclusive promotions and discounts along with additional product information and tips
[email protected] All right reserved